Making your first loaf of sourdough bread at home is a deeply rewarding journey.
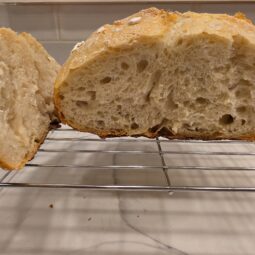
While it requires patience and time, the reward of a crackly, golden crust and a beautifully airy interior is absolutely unmatched.
Whether you are an experienced baker or a complete beginner, mastering this artisan craft is much easier than you think when you follow the right steps and a proven, reliable recipe.
Why Temperature Matters for Sourdough
Unlike quick breads, authentic sourdough bread relies entirely on a natural starter.
This means wild yeast and lactic acid bacteria are doing all the heavy lifting, making temperature control a crucial factor for success. Here is why:
Fermentation Speed
The wild yeast in your starter thrives best at a comfortable room temperature of around 24°C to 26°C. If your kitchen is too cold, the dough will take ages to rise, while an overly hot environment can make the dough sticky and over-fermented.
Flavor Development
A slower, cooler fermentation process—often done inside the refrigerator overnight—allows the bacteria to develop that signature rich, tangy flavor profile that everyone loves.
Cleaner Dough Structure
Keeping a consistent temperature ensures that the gluten network develops perfectly. This prevents your final loaf from flattening out in the oven, keeping it beautifully tall and round.
Sweet Caroline’s Tip
Always use a simple kitchen thermometer to check your water and dough temperature before mixing.
Quick Dive into Sourdough History
1. The Origins of Sourdough: The Oldest Bread in Human History
Sourdough is the very first leavened bread made by humanity. Long before commercial yeast was invented, it was discovered entirely by accident.
- Ancient Egypt (Around 3000 BC): In ancient Egypt, a piece of dough was accidentally left out, allowing wild yeast and lactic acid bacteria from the air to drift in and naturally ferment it. When this puffed-up dough was baked, it turned into a soft, airy bread rather than a hard flatbread—marking the birth of sourdough.
- A Symbol of the Gold Rush: During the 19th-century San Francisco Gold Rush, miners valued their sourdough starters so highly that they would keep them close to their bodies to protect them with their own body heat. This era popularized “San Francisco Sourdough,” famous worldwide for its distinctly sour flavor.
2. Common Types of Sourdough Bread
The flavor and texture of sourdough change completely depending on the type of flour used and how the starter is managed.
- White Sourdough: The most classic and popular style. It features large, open airy holes (crumb), a chewy texture, and a pleasantly mild tang.
- Whole Wheat Sourdough: This style brings out the nutty, hearty flavors of whole grains. While it is highly popular as a health bread due to its rich fiber content, it tends to be denser and less fluffy than white sourdough.
- Rye Sourdough (Rye Bread): Commonly enjoyed in Germany and Eastern Europe, this bread is known for its strong, sharp acidity and a dense, sticky, and deeply satisfying texture.
3. Regular Sourdough vs. European-Style Sourdough
When we talk about sourdough, it is generally divided into the American style (San Francisco style) and the European style (French, German, etc.). Here is how they differ.
| Category | Regular (American) Sourdough | European-Style Sourdough (Pain au Levain, etc.) |
| Sourness | Features a strong, sharp tang (a vinegar-like punch). | Emphasizes a subtle, mild acidity and deep savory flavors. |
| Main Bacteria | Driven by Lactobacillus sanfranciscensis, which produces high amounts of lactic acid. | Balances lactic acid bacteria and yeast to maximize the rich, nutty grain flavor. |
| Flour Type | Primarily centered around white bread flour. | Blends various grains such as whole wheat, rye, spelt, and einkorn. |
| Texture | Crispy crust with an incredibly chewy, elastic interior. | Heavy, moist crumb with a robust, earthy aroma. |
While both are delicious, your choice ultimately comes down to whether you prefer a clean, sharp, and punchy sour notes (Regular) or a deeper, nuttier, and more grain-forward aroma (European).
🛒 🔗 Shop This Recipe (Recommended Tools & Ingredients)
🛠️Tools List
📝 Ingredients List (Copy & Save!)
- Bread Flour (350g): The structural backbone of the loaf, responsible for that signature “crispy outside, chewy inside” artisan texture.
- Warm Water (240g): The essential foundation for hydration, creating the perfect environment for yeast activity and dough development.
- Active Levain (100g): The heart of your sourdough. Ensure your starter is bubbly, peaked, and at its most active state to guarantee a beautiful rise.
- Salt (8g): More than just flavor; it balances the tang, enhances the depth of the wheat, and tightens the gluten network for a better crumb.
Sweet Caroline’s Tips for a Milder Flavor: How to Tone Down the Sourness
If you find the sharp, tangy punch of traditional San Francisco sourdough a bit too intense, you can easily tweak your recipe to achieve a milder, nuttier European-style loaf. Here are three simple baker’s secrets to control the acidity:
- Feed Your Starter More Frequently: A hungry starter builds up more acetic acid (which tastes like vinegar). By feeding your starter regularly and using it right when it peaks, you’ll get a much sweeter, milder flavor.
- Use Warm Water for Fermentation: Lactic acid bacteria thrive in warmer temperatures (around 26°C to 28°C / 78°F to 82°F) and produce a creamy, yogurt-like richness rather than a sharp sour taste.
- Shorten the Cold Proof: While a long cold fermentation in the fridge deepens the sourness, shortening the cold proof time (or baking it after a room-temperature proof) will keep the flavors beautifully subtle and grain-forward.
How to Make Your Own Sourdough Starter (Levain) from Scratch
A sourdough starter is the living heart of sourdough baking. Instead of using commercial store-bought yeast, you will capture wild yeast and lactic acid bacteria from the air and flour. It typically takes about 6 to 7 days to build a strong, active starter.
What You Need to Bake Sourdough (Sourdough Starter)
- Flour: Rye or Whole Wheat flour is highly recommended for the first few days (their outer hulls contain more wild yeast). Unbleached bread flour works great too.
- Water: Filtered or bottled water (avoid tap water, as chlorine can kill the wild yeast).
- Jar: A clean, clear glass jar so you can watch it rise.
- Temperature: A warm spot (22°C to 25°C / 72°F to 77°F) is ideal.
The 7-Day Feeding Schedule
Day 1: The Beginning
- Mix 50g of flour and 50g of lukewarm water in your glass jar. Stir well until no dry flour remains.
- Rest the lid loosely on top (do not seal it airtight) so air can circulate, and leave it in a warm spot for 24 hours.
Day 2: Quiet Waiting
- You might not see much action yet, or perhaps just a few tiny bubbles.
- Add 50g of flour and 50g of water directly to the jar. Stir well and let it rest for another 24 hours.
Day 3: The First Signs of Life
- You should start noticing a slightly sour aroma and more visible bubbles. From today on, we must discard some of the mixture so the jar doesn’t overflow.
- Discard all but 100g of your starter.
- Add 50g of flour and 50g of water to the remaining 100g. Stir thoroughly.
Day 4 to Day 5: Getting Active
- The starter will begin to smell like fruity yogurt or sour beer. It will rise and fall after feedings.
- Repeat the Day 3 routine: Discard down to 100g of starter, then feed it 50g of flour and 50g of water.
Day 6 to Day 7: Ready for Baking!
- Your starter is ready when it doubles or triples in volume within 4 to 6 hours after a feeding. The sides of the jar should look spongy and packed with tiny pockets of air.
- It should smell pleasantly yeasty, tangy, and sweet—never foul or putrid.
How to Check If Your Starter Is Ready: The ‘Float Test’
If you want to be 100% sure your levain has enough gas to leaven a loaf of bread, try this simple test:
- Fill a glass with room-temperature water.
- Gently drop a teaspoon of your active starter into the water.
- The Result: If it floats gracefully on top, it’s full of trapped gases and ready to bake! If it sinks to the bottom, it needs a bit more time or another feeding.
Step-by-Step Instructions
1. Autolyse and Mixing
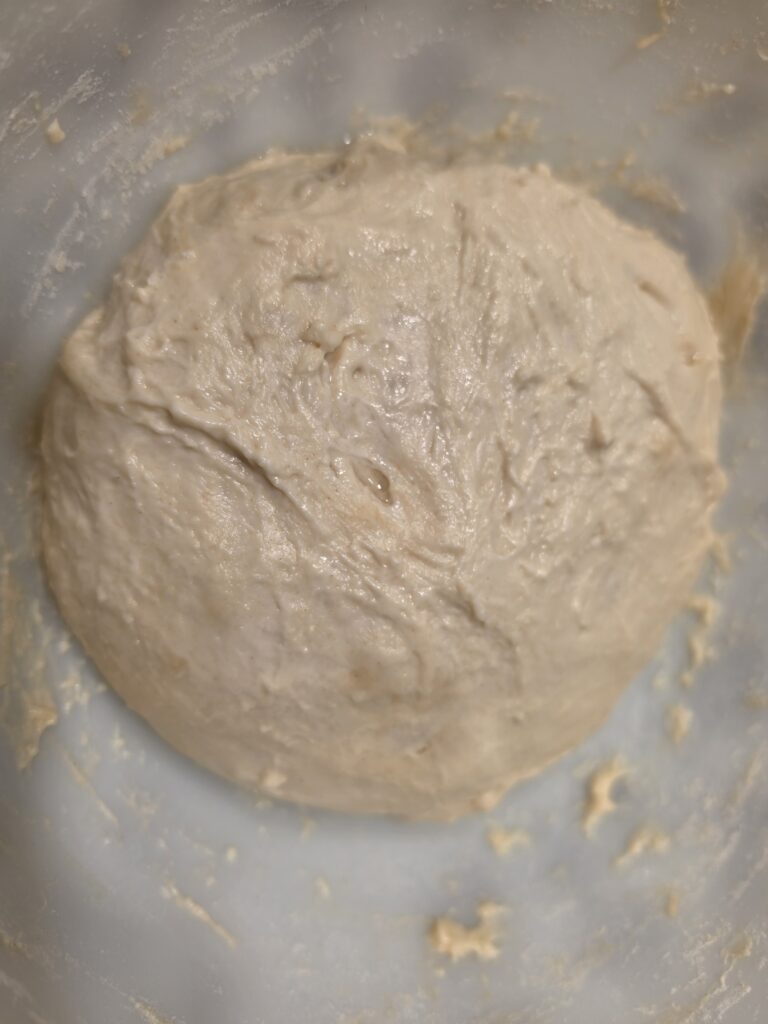
Mix your bread flour and water in a large bowl until no dry flour remains. Cover and let it rest for 30–45 minutes; this “autolyse” step is crucial for developing natural gluten. After the rest, add 100g of your active, bubbly levain and 8g of salt. Use your fingers to dimple the dough and mix thoroughly until the texture is smooth and well-incorporated.
2. Stretch and Fold (Bulk Fermentation)
Instead of heavy, traditional kneading, use the “stretch and fold” method to gently build strength. With wet hands, grab one side of the dough, stretch it upward, and fold it over the center. Rotate the bowl and repeat for all four sides. Perform this routine 4 times, with 30-minute intervals in between, to create a strong, elastic dough.
3. Shaping and Cold Retard
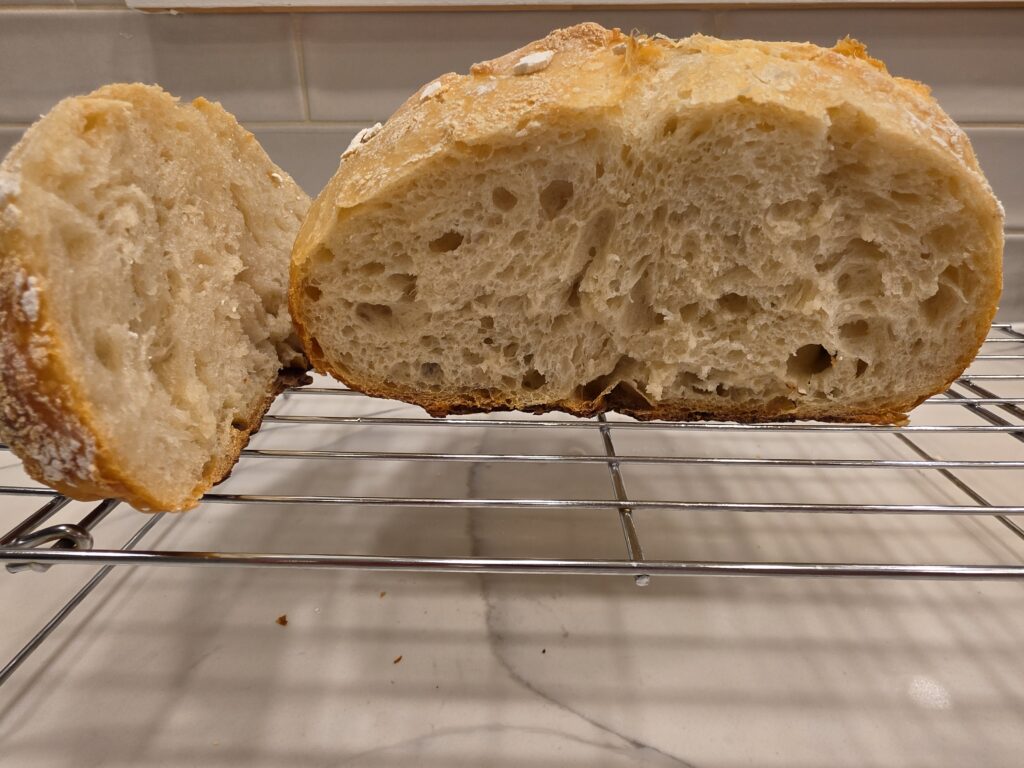
Once the dough is airy and has increased in volume by about 50%, gently shape it into a tight round or oval. Place it “seam-side up” into a floured banneton basket. Cover tightly and transfer to the refrigerator for a cold overnight rise (12 to 15 hours). This slow fermentation is the secret to locking in that deep, complex sourdough flavor.
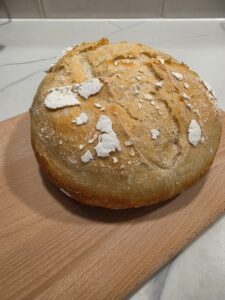
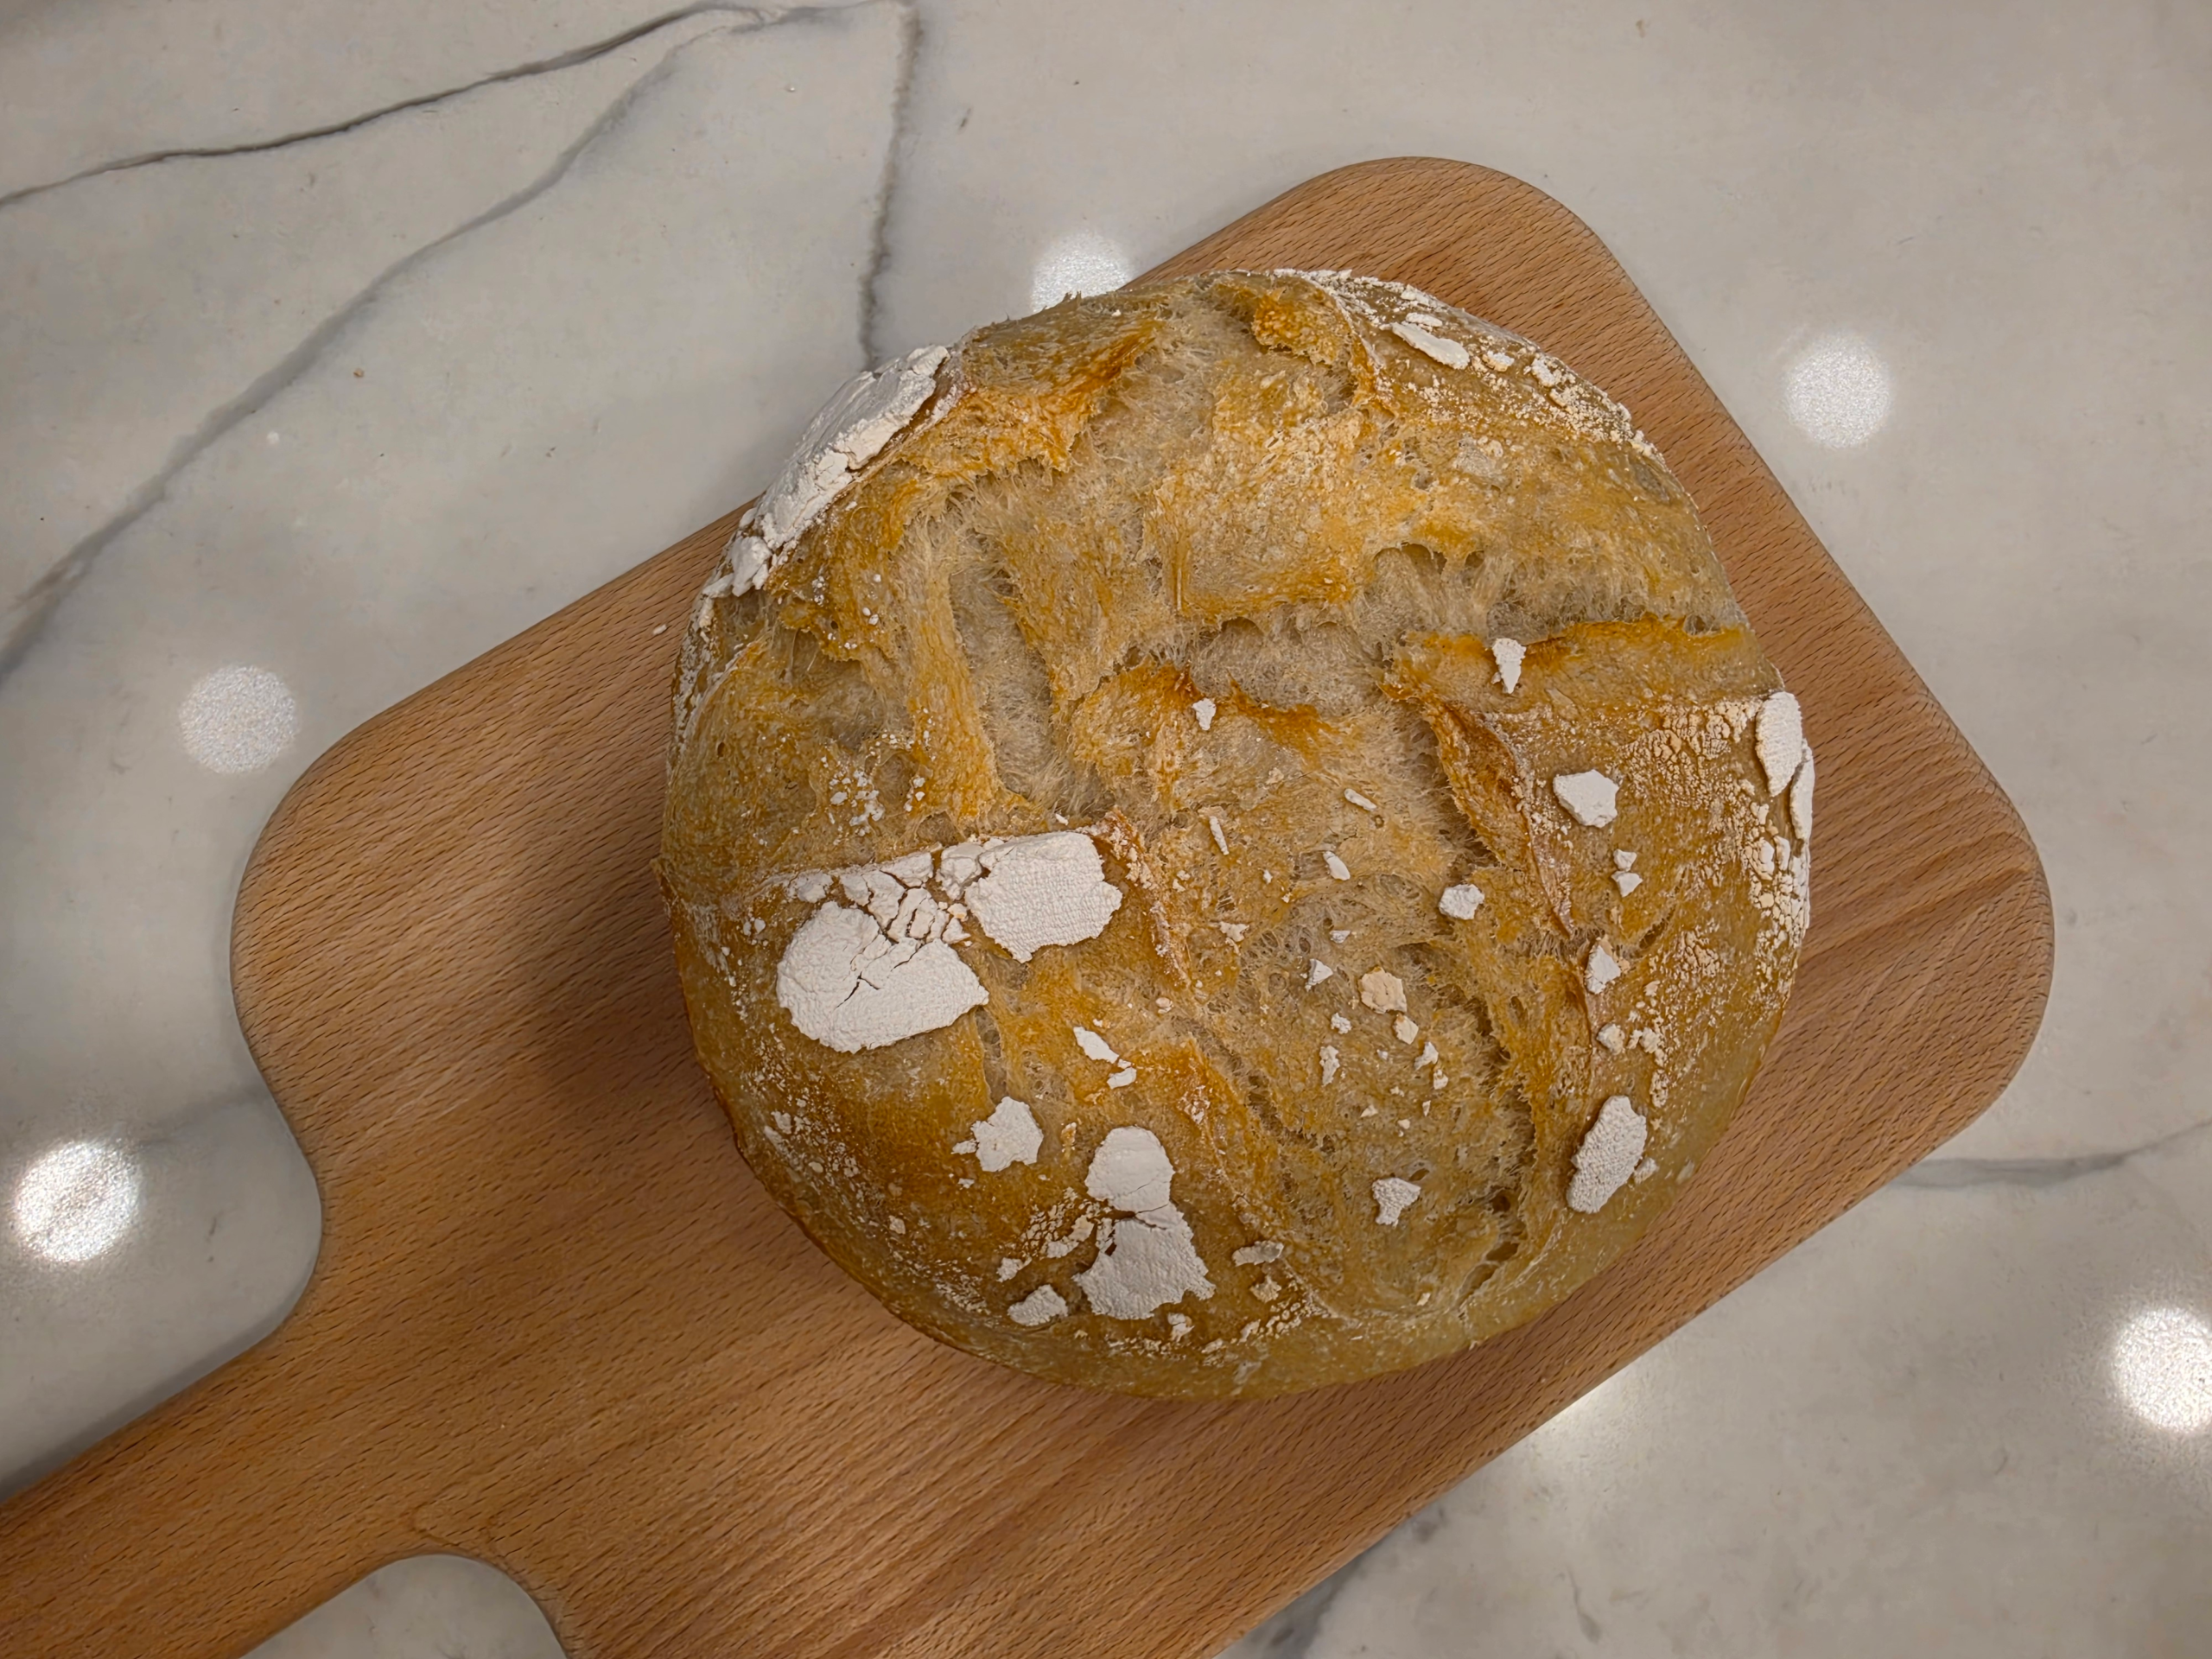
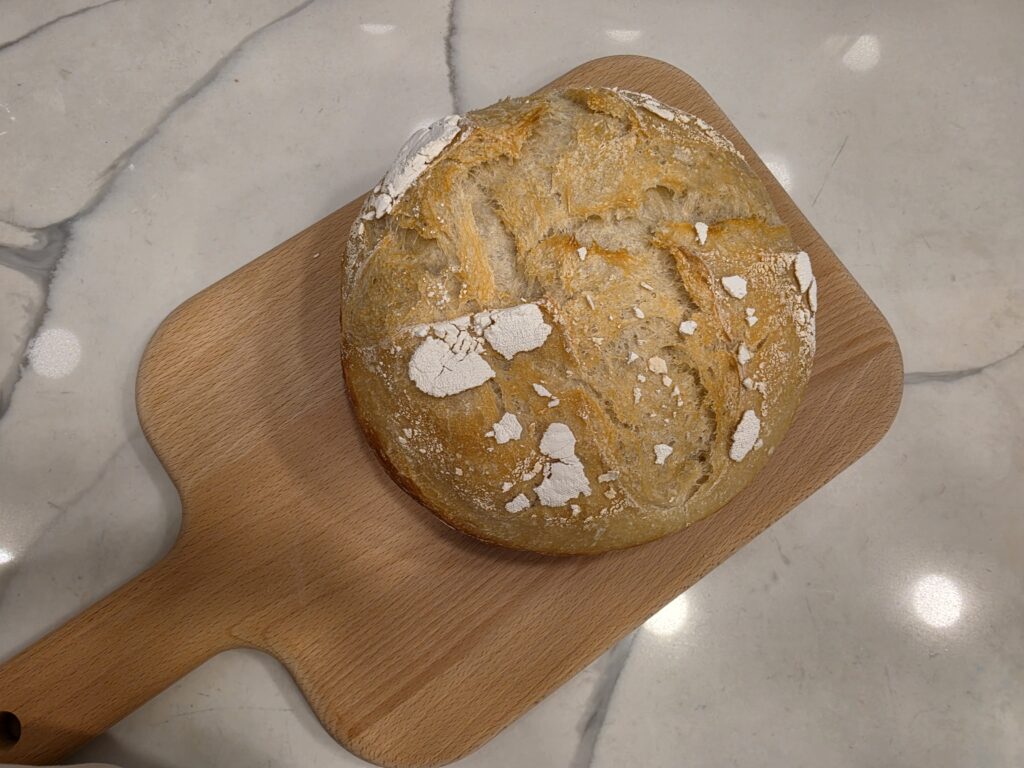
4. Scoring and Baking
Preheat your oven and Dutch oven to 245°C (475°F). Carefully turn your cold dough out onto parchment paper. Using a sharp razor blade (lame), make a deep, confident slash across the top to control the rise.
- Bake: Bake inside the covered Dutch oven for 20 minutes to trap the steam and ensure a beautiful “oven spring.” Then, remove the lid, lower the temperature to 220°C (430°F), and bake for another 20–25 minutes until the crust turns a deep, crackly golden brown.
No Dutch Oven or Basket? No Problem!
If you don’t own a heavy cast-iron Dutch oven, you can still achieve a magnificent, crispy crust using a standard baking sheet or pizza stone. The secret to a great artisan loaf is steam, and here is how you can create it manually.
How to Store and Freeze Your Leftover Sourdough Bread
To keep your homemade sourdough bread fresh and crusty for days, follow these simple storage tips:
- At Room Temperature: Never store sourdough in a plastic bag, as it ruins the crispy crust. Instead, keep it cut-side down on a wooden cutting board or store it in a paper bag for up to 4 days.
- In the Freezer: Sourdough freezes beautifully. Slice the loaf completely, wrap individual slices tightly in plastic wrap, and freeze for up to 3 months. Pop a frozen slice straight into the toaster whenever you want a fresh bite!
Sweet Caroline’s Kitchen recipes here
How to Bake the Most Insanely Delicious Tomato & Basil Sourdough Bread
How to Make the Best Lighter & Moist Quinoa Bread
Now, are you ready to bake your very first loaf of sourdough? If you have any questions along the way, feel free to leave a comment below!
Classic Sourdough Bread for Beginners
Equipment
- 1 Large Mixing bowl
- 1 Dutch Oven
- 1 Banneton (Proofing Basket)
- 1 Scraper
- 1 Blade or Knife
- 1 Scale
Ingredients
- 350 g Bread Flour
- 240 g Water
- 8 g Salt
- 100 g Levain (=Soughdough Starter)
Instructions
Autolyse and Mixing
Mix your flour and water in a large bowl until no dry flour remains. Let it rest for 30-45 minutes to develop natural gluten. After the rest, add 100g of your refreshed, active levain and 8g of salt. Dimple the dough with your fingers and mix thoroughly until smooth.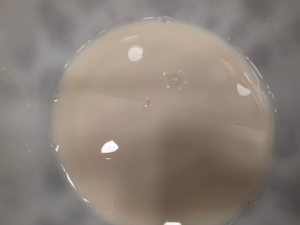
Stretch and Fold (1st Fermentation)
Instead of heavy kneading, use the stretch and fold method to build structure. Wet your hands, grab one side of the dough, stretch it upward, and fold it over the center. Rotate the bowl and repeat for all four sides. Perform this routine 4 times, spaced 30 minutes apart.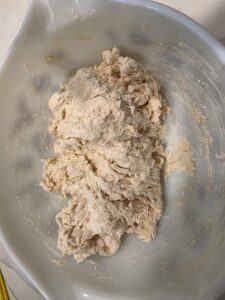
Shaping and Cold Retard
Once the dough is airy and has increased in volume by about 50%, gently shape it into a tight round or oval shape. Place it cut-side up into a floured banneton basket. Cover it well and transfer it to the refrigerator for a cold overnight rise (12 to 15 hours). This slow fermentation locks in the deep flavor.
Scoring and Baking
Preheat your oven to 245°C (475°F). If you have a Dutch Oven, preheat it as well. Turn your cold dough out onto parchment paper and use a sharp razor blade to make a deep slash across the top.- Bake Bake inside the covered Dutch oven for 20 minutes to trap the steam. Then, remove the lid, lower the temperature to 430°F (220°C), and bake for another 20 minutes until the crust turns a deep, crackly golden brown.