savory artisan olive scones

8 Stunning Savory Artisan Olive Scones: The Ultimate Recipe

Welcome back to Sweet Caroline’s Kitchen!

Learn how to make the best savory artisan olive scones at home!

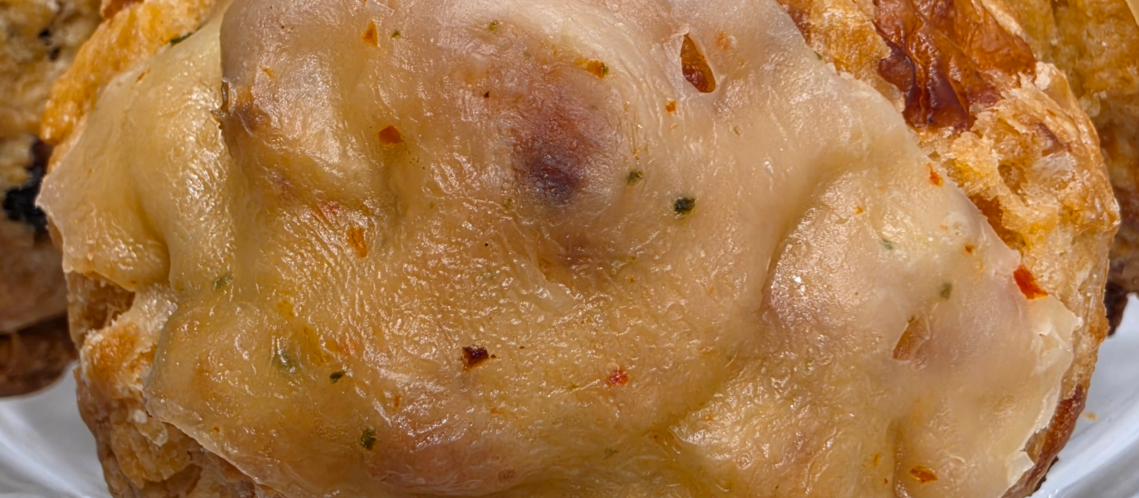
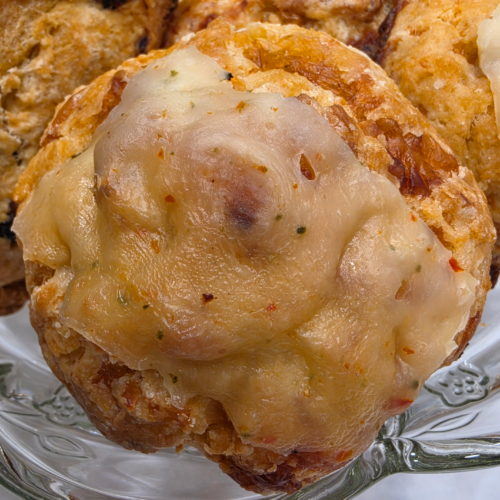
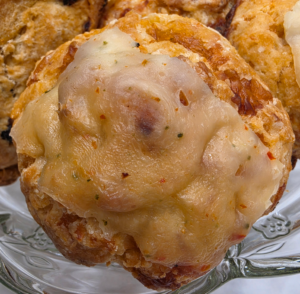
After the amazing response to my savory smoked cheese scones, I wanted to share another savory favorite that often makes an appearance in my kitchen: Mediterranean-Style Olive Scones. While many think of scones as a sweet treat, these artisan savory scones prove that they can be just as decadent and satisfying when paired with the right ingredients.

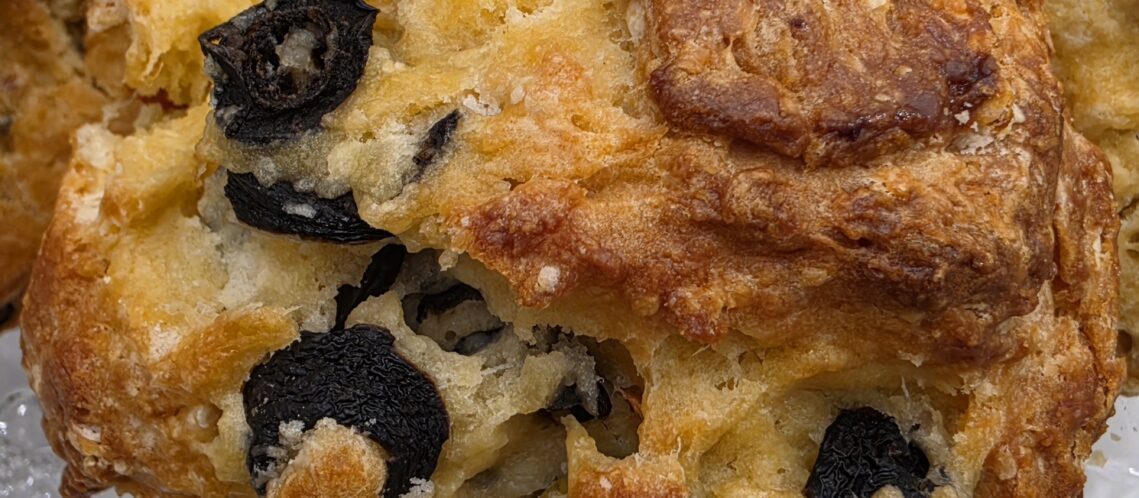
There is something truly sophisticated about the briny, earthy flavor of olives paired with a buttery, flaky scone base. These aren’t your typical sweet breakfast treats; they are bold, savory, and pair beautifully with a glass of wine, a charcuterie board, or a simple smear of cream cheese. If you appreciate artisan flavors and textures, this recipe is for you. The briny pop of olives combined with a buttery, flaky crust creates a sophisticated flavor profile that is perfect for brunch, an afternoon snack, or even as a side for your favorite soup.

“Baking is all about bringing together simple ingredients to create something extraordinary. I hope these olive scones bring a little bit of Mediterranean sunshine to your home.

Don’t forget to take a photo of your beautiful bakes and share them with me! I love seeing how your versions turn out. Happy baking, everyone!”

Sweet Caroline’s Kitchen recipes here.

Sweet Caroline’s Ingredient Tip

Kalamata & Green Olives — Use a mix of Kalamata and stuffed green olives for deeper Mediterranean flavor.

Drain them well and pat completely dry to prevent excess moisture in the dough. If the olives are very salty, give them a quick rinse before drying.

I highly recommend using Kalamata olives for their rich, fruity flavor. If they are very salty, give them a quick rinse before drying.

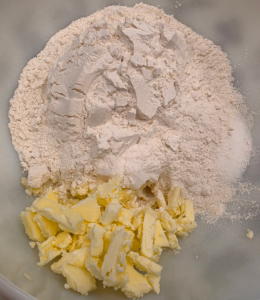
Cold Butter — Keep the butter very cold and cut it into small cubes. When rubbed into the flour, it should form coarse crumbs with some pea‑sized pieces remaining—this is what creates the flaky, layered texture.

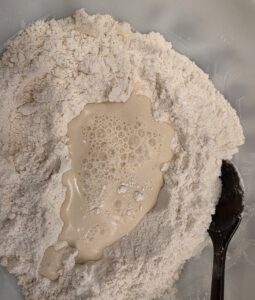
Heavy Cream & Egg Mixture — Whisk the cream and eggs until smooth before adding.

This ensures even hydration and helps the scones rise with a tender crumb. For a truly artisan look, brush the tops with a little extra cream and sprinkle a few flakes of sea salt before popping them in the oven.

When making these savory artisan olive scones, texture is everything.

Leaving visible pieces of cold butter throughout the dough ensures that steam creates beautiful, airy pockets during baking.

This results in the ultimate flaky and tender crumb that complements the bold, salty Mediterranean olives perfectly.

Flour — Use all‑purpose flour for the right balance of structure and tenderness. Avoid overmixing once the wet ingredients go in—stop as soon as a shaggy dough forms.

Honey — A touch of honey adds subtle depth and rounds out the briny olive flavor without making the scones sweet.

Finishing Touch — Brush the tops with cream and sprinkle a few flakes of sea salt before baking for a true artisan look and flavor.

This savory artisan olive scones recipe is perfect for brunch, afternoon snacks, or a refined savory treat.

🛒 🔗 Shop This Recipe (Recommended Tools & Ingredients)

🛠️Tools List

Mixing Bowl

Cutting Board

Paring Knife

Silicon Spatula

Fine Mesh Strainer

Silicone Brush

Digital Scale

Baking Pan

Parchment paper

Cooling Rack

📝 Ingredients List (Copy & Save!)

415g All-Purpose Flour

18g Baking powder

67g Unsalted Butter

193g Eggs

153g Heavy Cream

59g Honey

100g Black Olive

100g Stuffed Green Olive


savory artisan olive scones

Savory Olive Scone

Buttery, flaky scones infused with briny Kalamata and green olives for a bold Mediterranean twist—perfect for brunch, wine pairings, or a refined savory treat.
Prep Time 30 minutes
Cook Time 25 minutes
30 minutes
Course Breakfast, Snack, Soup, Tea Time
Servings 6 EA

Equipment

  • 2 Mixing Bowls
  • 1 Cutting Board
  • 1 Paring Knife
  • 1 Silicone Spatula
  • 1 Fine Mesh Strainer
  • 1 Silicon Brush
  • 1 Scale
  • 1 Baking Pan
  • 1 Parchment Paper

Ingredients
  

  • 415 g All-Purpose Flour
  • 18 g Baking Powder
  • 67 g Unsalted Butter
  • 193 g Egg
  • 153 g Heavy Cream
  • 59 g Honey
  • 100 g Black Olive
  • 100 g Stuffed Green Olive

Instructions
 

  • Prepare the Olives
    Drain the olives thoroughly and pat them dry with a paper towel. This prevents excess moisture from making the dough soggy. Roughly chop them if they are large.
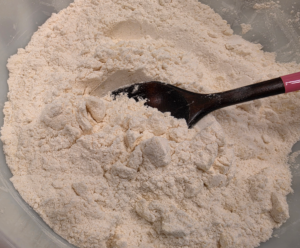
  • Cut in the Butter
    Add the cold, cubed butter to the dry mix. Use a pastry cutter or your fingertips to rub the butter into the flour until the mixture resembles coarse crumbs with some pea-sized bits remaining.
  • Whisk the Wet Ingredients
    In a separate bowl or jug, whisk the eggs and heavy cream until well combined.
  • Combine and Fold
    Gently toss the dried olives into the flour mixture. Make a well in the center and pour in the wet mixture. Use a spatula to fold everything together just until a shaggy dough forms. Do not overmix.
  • Shape and Chill
    Turn the dough onto a lightly floured surface. Gently pat it into a circle about 1 inch (2.5cm) thick. For the best rise and flakiness, wrap the dough and let it rest in the refrigerator for at least 30 minutes.
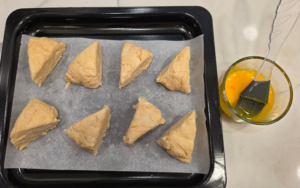
  • Preheat and Bake
    Preheat your oven to 350°F (180°C). Cut the chilled dough into 8 even wedges. Place them on a baking sheet lined with parchment paper.
    Final Touch:Bake for 25 minutes, or until the scones are tall and turn a beautiful golden brown on the tops and edges.
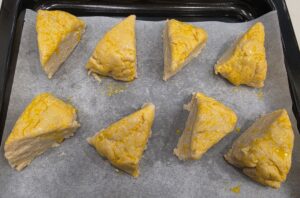
  • Cool
    Transfer to a wire rack and let them cool slightly before serving. They are best enjoyed warm!
    savory artisan olive scones
Keyword Baking, Black Olive, Cream, Easy Recipe, Egg, Green Olive, Kalamata, Meditrian, Olive, Scone

Savory smoked cheese scones with flaky layers served on a plate

How to Optimize Your Savory Smoked Cheese Scones(Perfect Flaky Layers)

Waking up to the first day of May 2026

A day filled with brilliant sunshine and there’s such a lovely, refreshing breeze in the air that feels just right.

Flaky, buttery, and packed with smoky goodness! If you are tired of overly sweet dessert scones, it’s time to upgrade your baking game with these Savory Smoked Cheese Scones. With a deep smoky aroma and a perfectly salted profile, these scones are not just a great breakfast item, but they also double as the ultimate pairing for a glass of wine or cold beer.

The secret to this recipe lies entirely in the cheese combination. It’s not just about adding flavor; it’s about understanding how different cheeses bake inside the oven to create the perfect texture. Before we jump into the kitchen, let’s look at why we chose these specific ingredients and what they do for our dough.

Why You’ll Love These Cheese Scones

These savory smoked cheese scones deliver a perfect harmony of crumbly texture and rich cheddar depth. The slight sweetness of the dough balances beautifully with the salty, smoky cheese, making them ideal for both coffee and tea.

Sweet Caroline’s Tip

Choosing the Right Cheese for Your Scone
  • Smoked Cheese (The Star): Adds a deep, bacon-like wood-smoke aroma. Since it’s a semi-hard cheese, it holds its shape beautifully inside the oven, giving you a delightful, chewy texture in every bite.
  • Cheddar Cheese (The Flavor Booster): Melts smoothly into the dough, providing a rich, savory punch and a gorgeous golden color. It keeps the inside of the scone perfectly moist.
  • Parmesan (The Texture Protector): Packed with umami but contains almost zero moisture. Grating this into your dough adds intense savory flavor without making your dough wet or sticky, preserving those crispy layers.

The Magic of Ingredients

Each ingredient plays a key role in creating flaky layers and deep flavor. From cold butter to smoked cheese, the combination brings out a warm, comforting aroma that fills your entire kitchen.

Sweet Caroline’s Tips for Perfect Cheese Scones

1) Keep Everything Cold

Cold butter and cold liquids create those beautiful flaky layers. Handle the dough quickly so the butter doesn’t melt before baking.

2) Add a Spicy Kick (Optional)

Smoked spicy cheese adds depth, but aged cheddar works wonderfully if you prefer a classic flavor.

3) Smoked Cheese Substitute

If you don’t have smoked cheese, don’t worry. Simply use cheddar or Gouda instead and add ½ tsp of smoked paprika to bring back that rich, smoky flavor.

Ingredient Substitutions

  • Smoked cheese → Cheddar + ½ tsp smoked paprika
  • Gouda also adds a soft, nutty richness to the scones.
  • If you prefer a bit of heat, I recommend using smoked spicy cheese.

Baking Therapy at Home

In our busy lives, there’s nothing more soothing than feeling flour between your fingers and watching dough rise. This cheese scone recipe is simple enough for beginners yet satisfying enough to make you feel like a professional pastry chef.

Final Thoughts

Savory smoked cheese scones are comforting, flavorful, and surprisingly easy to make.

Sweet Caroline’s Kitchen recipes here.

🛒 🔗 Shop This Recipe (Recommended Tools & Ingredients)

🛠️Tools List

Mixing Bowl

Paring Knife

Silicon Spatula

Silicone Brush

Digital Scale

Baking Pan

Parchment paper

Cooling Rack

📝 Ingredients List (Copy & Save!)

415g All-Purpose Flour

18g Baking powder

67g Unsalted Butter

193g Eggs

153g Heavy Cream

59g Honey

100g Smoked Spicy Cheese

100g Mozzarella Cheese

Savory smoked cheese scones with flaky layers served on a plate

Savory Smoked Cheese Scone

Rich, smoky cheese melts into buttery layers to create these tender, savory scones. Each bite delivers a warm, comforting depth of flavor with a delicate crumble, making them perfect for brunch, a light meal, or a cozy afternoon treat. A rustic yet refined twist on classic cheese scones.
Prep Time 29 minutes
Cook Time 25 minutes
30 minutes
Course Breakfast, Cheese, Dessert, Scone, Snack, Soup, Tea Time
Servings 6 EA

Equipment

  • 2 Mixing Bowl
  • 1 Silicone Spatula
  • 1 Baking Pan
  • 1 Parchment Paper
  • 1 Silicon Brush
  • 1 Scale
  • 1 Paring Knife

Ingredients
  

  • 415 g All-Purpose Flour
  • 18 g Baking Powder
  • 67 g Butter
  • 193 g Egg
  • 153 g Heavy Cream
  • 59 g Honey
  • 100 g Smoked Spicy Cheese
  • 100 g Mozzarella Cheese

Instructions
 

  • Prepare the Dry Base
    In a large bowl, whisk together the flour, baking powder, and sugar. Cut the cold butter into the flour mixture using a pastry cutter or a fork until it resembles small peas.
  • Mix the Liquids
    In a separate bowl, whisk the eggs and whipping cream together until well combined
  • Fold in the Cheese: Add the shredded smoked spicy cheese and mozzarella to the dry ingredients and toss lightly to coat..Form the Dough: Make a well in the center and pour in the liquid mixture. Stir gently until just combined. Sweet Caroline's Tip: Do not overwork the dough! Stop as soon as the flour disappears to keep the scones tender.
  • Chill & Shape
    Pat the dough into a disk about 1 inch (2.5cm) thick. For the best rise, wrap it and let it rest in the fridge for 30 minutes. Cut into wedges or rounds.
  • Bake
    Preheat your oven to 350℉ (180°C). Place the scones on a baking sheet and bake for 25 minutes or until they turn a beautiful golden brown.
    Savory smoked cheese scones with flaky layers served on a plate
Keyword Baking, Black Olive, Cheese Scone recipe, Easy Recipe, Egg, Green Olive, Home Baking, Kalamata, Meditrian, Savorsy Scones, Savory, Scone, Smoked Cheese

Freshly baked classic plain British scones with a golden-brown crust

The Golden Standard: How to Bake the Classic Plain Scone

Hi everyone, Sweet Caroline here!

Today, I’m sharing a true cornerstone of my baking repertoire: the Classic Plain Scone.

A scone is far more than just a simple flour-based bake. It is the science of ‘layers’—a delicate reaction triggered by cold butter in a hot oven—and the ultimate result of precise temperature control. While many believe scones are destined to be dry and crumbly, with the right understanding and the proper tools, anyone can master a ‘Golden Standard’ scone: perfectly crisp on the outside, yet tender and moist on the inside.

Why is ‘Plain’ the Height of Perfection?


In baking, I always find that the simpler the ingredients, the more clearly their quality shines through. A plain scone is the most honest meeting point between high-quality flour and fragrant, cold butter.

It’s like the “negative space” in a beautiful painting—elegant in its simplicity.In my kitchen, a perfect scone must meet two golden standards:
the Baker’s Smile: That characteristic jagged crack along the side where the dough has risen powerfully in the oven. It’s a badge of honor that guarantees a light, airy texture.
The Golden Crack: A beautiful contrast between a crisp, golden-brown top and a cloud-like, tender interior.


A Scottish Legacy, A Royal Tradition


The scone’s history dates back to 16th-century Scotland. Named after the “Stone of Destiny” (the Stone of Scone), this humble bread eventually became the centerpiece of British Afternoon Tea culture, thanks to Anna Maria, the Duchess of Bedford.
From elegant royal tea rooms to rustic farmhouse breakfast tables, the scone has been beloved across generations. And through it all, the plain scone remains the most timeless, classic form.

Sweet Caroline’s Tips:


The ultimate way to enjoy a scone is, of course, a “Cream Tea” setup. But this brings us to one of the great debates: Jam first, or cream first?
Devon Style: Slather a thick layer of clotted cream first, then add a dollop of strawberry jam on top. The richness of the cream hits your palate first, elevating the overall flavor.
Cornish Style: Spread the jam across the base first, then crown it with a mountain of cream. The sweetness of the jam mingles beautifully with the cream for a vibrant taste.
Personally, I’m a “Devon Style “lover—there’s something magical about how the clotted cream highlights the buttery notes of the scone. Which side are you on?

You don’t need a professional bakery to achieve these results—you just need the right tools to maintain the integrity of the dough.”

🛒 🔗 Shop This Recipe (Recommended Tools & Ingredients)

🛠️Tools List

  • Digital Scale: Baking Accuracy. Measuring by weight (grams) rather than volume ensures perfect, consistent results every time.
  • Big Mixing Bowl: Provides enough space to mix ingredients without overworking the dough, keeping it light and airy.
  • Silicone Spatula: Your best friend for folding the dough gently. It allows you to combine ingredients without deflating the air pockets.
  • Silicone Brush: Essential for applying a light egg wash, ensuring your scones achieve that professional, glossy golden-brown finish.
  • Baking Pan & Parchment Paper: Ensures even heat distribution and prevents the base from sticking, guaranteeing a clean, beautiful bake every time.
  • Paring Knife or Scraper: A sharp, clean edge allows you to cut the dough without compressing the sides, helping the scones rise tall and straight in the oven.
  • Sieve: Aerates the flour and baking powder, removing any clumps to ensure a delicate, tender crumb throughout.
  • Cooling Rack: Promotes proper airflow, preventing the bottoms from becoming soggy due to trapped steam after baking.

Many people think a scone is just a quick biscuit, but it’s actually a precise study in temperature control. To get that professional lift, every ingredient plays a specific role.”

📝 Ingredients List (Copy & Save!)

Quality ingredients are the foundation of a truly authentic scone.

  • All-Purpose Flour (415g): The structure of your scone. Always sift it to maintain a light, tender crumb.
  • Cold Unsalted Butter (67g): The Secret to Flakiness. Small, cold pieces of butter melt in the oven, creating those signature, buttery layers.
  • Eggs (193g / 4 Large): Acts as the structure-builder. They add richness and a stable base, preventing the scones from becoming too brittle.
  • Heavy Cream (153g): The secret to the luxurious, melt-in-your-mouth texture. It provides the necessary moisture and fat that sets these scones apart from dry, bakery-standard versions.
  • Honey (59g): Beyond adding a subtle, floral sweetness, honey is hygroscopic—meaning it helps retain moisture, keeping your scones fresh and soft for much longer.
  • Baking Powder (18g): The powerhouse of the recipe. It ensures your scones rise vertically, creating that characteristic “Baker’s Smile” on the side.
  • Salt (3g): The essential “flavor bridge.” It balances the richness of the butter and cream, elevating all the other ingredients and adding depth to the final flavor profile.

Sweet Caroline’s Tip:

Scones are highly sensitive to temperature. Always work in a cool environment; if your hands tend to be warm, chill your workspace and tools beforehand. This simple step is the secret to maintaining the integrity of the butter and achieving those perfect, flaky layers.

Step-By-Step Instructions

Mastering the perfect scone comes down to speed and minimal handling.

  1. Sift: Whisk together all dry ingredients to ensure a light, airy base.
  2. Cut in Butter: Quickly incorporate cold, cubed butter until the mixture resembles coarse crumbs. Keep it cold!
  3. Combine: Fold in the wet ingredients gently until just barely combined—do not overmix.
  4. Shape & Chill: Pat into a disc, cut into 6 wedges, and chill for 30 minutes to lock in the shape.
  5. Bake: Brush with egg wash and bake at 180°C (350°F) for 25 minutes until golden, tall, and beautifully risen.

Beyond the Classic Scone

Now that you’ve mastered the art of the perfect scone, you’re ready to explore even more treasures from my kitchen. Baking is a journey, and there’s always something new to create.

If you enjoyed the delicate, buttery layers of these classic scones, I highly recommend trying these reader-favorite recipes next: Click here to browse my full recipe collection.

Caroline’s Kitchen recipes here.


Let’s Talk Baking!

I’d love to hear how your bake turned out! Did you enjoy them with clotted cream or butter? Are you a Devon-style or a Cornish-style fan?

Share your experience in the comments below—I read every single one!


Classic Plain Scone

Learn how to make classic, bakery-quality standard "British Classic Scones" that are perfect for traditional tea time.
I’ll show you how to easily achieve that professional bakery quality—with a perfectly rich buttery flavor, a golden crunch exterior, and moist interior.
Prep Time 30 minutes
Cook Time 25 minutes
Chilling Time 30 minutes
Course Breakfast, Snack, Tea Time
Cuisine British
Servings 6 EA
Calories 497 kcal

Equipment

  • 1 Big Mixing Bowl for Dry Mix
  • 1 Bowl for Liquid Mix
  • 1 Silicone Spatula
  • 1 Baking Pan
  • 1 Parchment Paper
  • 1 Scraper or knife
  • 1 Sieve
  • 1 Silicone Brush
  • 1 Small Bowl for Egg Wash

Ingredients
  

  • 415 g All-purpose Flour
  • 18 g Baking Powder
  • 67 g Cold Unsalted Butter Small Pea Size Cubed
  • 193 g Eggs (Big Size 4 EA)
  • 60 g Honey
  • 153 g Heavy Cream Able to use Butter Milk
  • 3 g Salt

Instructions
 

  • Prep the Dry Ingredients
    Sift the all-purpose flour and baking powder into a large mixing bowl.
    Add a pinch of salt and whisk lightly to combine.
  • Incorporate the Cold Butter
    Add the cold, cubed butter to the flour mixture.
    Using a silicone spatula ,quickly work the butter into the flour until
    the mixture resembles coarse crumbs,( about the size of peas)
    Caroline's Tip : Keep the butter as cold as possible to achieve a flaky
    texture.
  • Mix the Liquid Ingredients
    In a separate small bowl, whisk together the eggs, heavy cream and
    honey. Create a well in the center of the dry ingredients and pour in the
    liquid mixture. Gently fold with a silicone spatula until just combined.
    Caroline's Tip : "Do Not Overmix "
    Overmixing develops too much gluten in the flour which makes the
    scones tough and rubbery rather than light and flaky.
    you want tiny bits of cold butter to remain intact so they create steam in
    the oven, resulting in a beautiful rise and airy layers.
  • Shape and Chill the Dough
    Turn the dough out onto a lightly floured surface.
    Gently pat it into a disc about 1 inch (2.5 cm) thick.
    Caroline's Tip : Do not use a rolling pin: using your hands keeps the
    dough light.
    Wrap the dough in the refrigerator for 30 minutes.
    Caroline's Tip : This ensures the butter stays cold for a better rise.
  • Cut and Arrange
    Preheat your oven to 350 ℉ ( 180℃)
    Take the chilled dough out and cut it into 6 even wedges (like a pizza)
    using a floured knife. Place the wedges onto a baking sheet lined with
    parchment paper, leaving some space between each scone.
  • Egg Wash and Bake
    Brush the top of the scones with the egg wash for beautiful golden-
    brown finish. Bake for 25 minutes, or until the scones are tall and
    golden. transfer to a wire rack to cool slightly before serving.
    Caroline's Tip for serving.
    These scones are best served warm. Enjoy them with your favorite fruit
    jam, thick clotted cream, or a pat of butter.
    They pair perfectly with a hot cup of tea or freshly brewed coffee for the
    ultimate afternoon treat.
    For kids, these buttery scones make a wonderful snack when paired with
    a cold glass of milk or mug of creamy hot chocolate.
Keyword Baking, Classic, Cream, Easy Recipe, Egg, Home Baking, Perfectly Buttery & Flaky Plain Scone, Plain, Scone

Sweet Caroline’s Kitchen recipes here.